【PR】この記事には広告が含まれています。
先代のRaspberry Pi 4から性能が2~3倍向上したと話題のRaspberry Pi 5(以下Pi 5)。確かに動作速度は高速であるものの、実は注意ポイントの多い「くせ者」モデルであることはあまり知られていません。
他のラズパイにはない注意すべき点は次のとおりです。
- 推奨電源が5V5A
- カメラコネクタが特殊
- 冷却ファンが必須
- GPIOライブラリが一部非対応
- pipの使用には仮想環境が必要
自称ラズパイマニアの僕は、国内で技適の取得待ちのころからPi 5を入手して動作検証してきました。歴代のラズパイを使ってきた僕が、これまでのラズパイとの違いをメインに解説します。
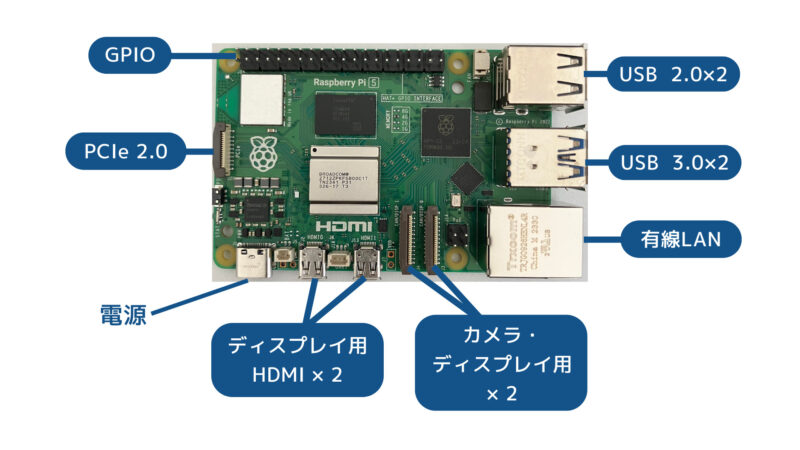
| SoC | Broadcom BCM2712 |
| CPU | Cortex-A76 64-bit SoC @ 2.4GHz × 4(4コア) |
| GPU | VideoCore VII 800MHz |
| メモリ | 2GB、4GB、8GB、16GB LPDDR4X-4267 SDRAM |
| 有線LAN | 1000 Base-T |
| 無線LAN | IEEE 802.11b/g/n/ac 2.4/5GHz |
| Bluetooth | Bluetooth 5.0 (Bluetooth Low Energy対応) |
| 消費電力 | 12W(ピーク時) |
| 大きさ | 85 × 56 × 18mm |
| 重量 | 47g |
| 参考価格 (スイッチサイエンス) | 1GB:???円 2GB:11,990円 4GB:13,090円 8GB:20,020円 16GB:30,580円 |
購入時に注意すべき点
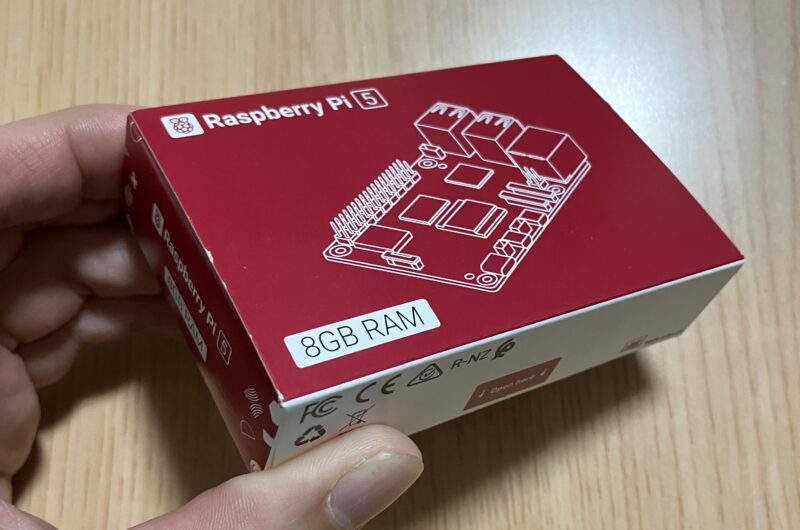
Raspberry Pi 5を購入する前に知っておくべき5つの注意点を、他のモデルとの違いという視点で解説します。
推奨電源が5V5A
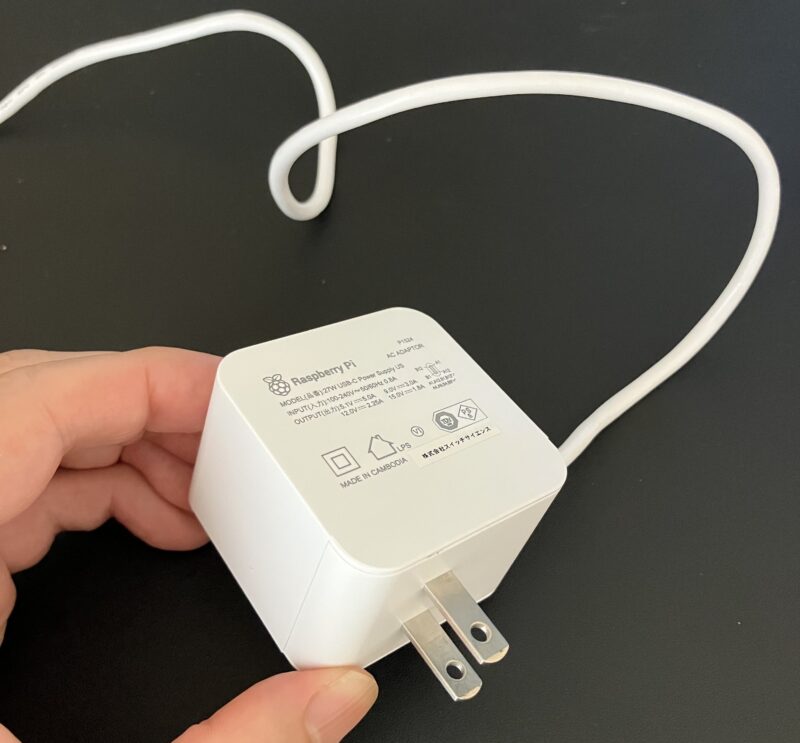
Raspberry Pi 5には、5V 5AのUSB-C電源が推奨されています。Raspberry Pi公式の電源はスイッチサイエンスで購入可能です。

推奨電源を使用しない場合、起動時に「周辺機器への電力供給は制限される」というメッセージが表示されます。
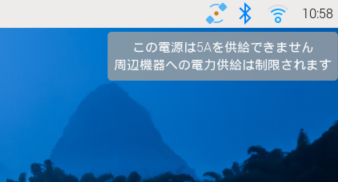
この制限はシステムの安定性を確保するためのもので、Pi 5にUSB接続した周辺機器への電源供給が最大600mAまでとなります。5V 5Aの電源が認識されると、600mAの制限は1.6Aまで自動的に引き上げられます。
600mAは一般的なキーボード、マウス、USBメモリなどには十分ですが、消費電力の多いHDDなどを接続する場合に不足する可能性があります。ただし、警告メッセージが表示されてもPi 5の処理性能には影響しません。
秋月電子の「スイッチングACアダプター(USB ACアダプター) Type-Cオス 5.1V 3.8A」を使用すると、起動時に警告メッセージが表示されますが、実際には問題なく使用できます。
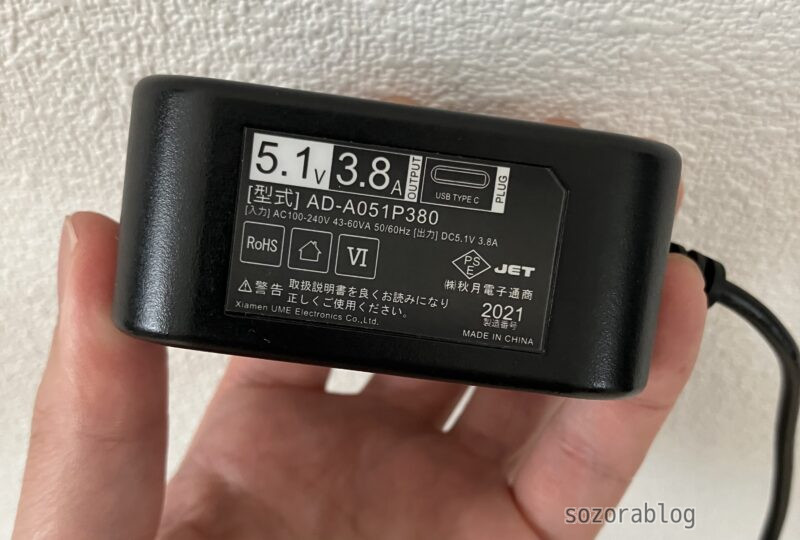
つまり、3.8Aの電源でも通常の使用には十分であり、高負荷のデバイスを多く接続しない限り、大きな問題は発生しません。
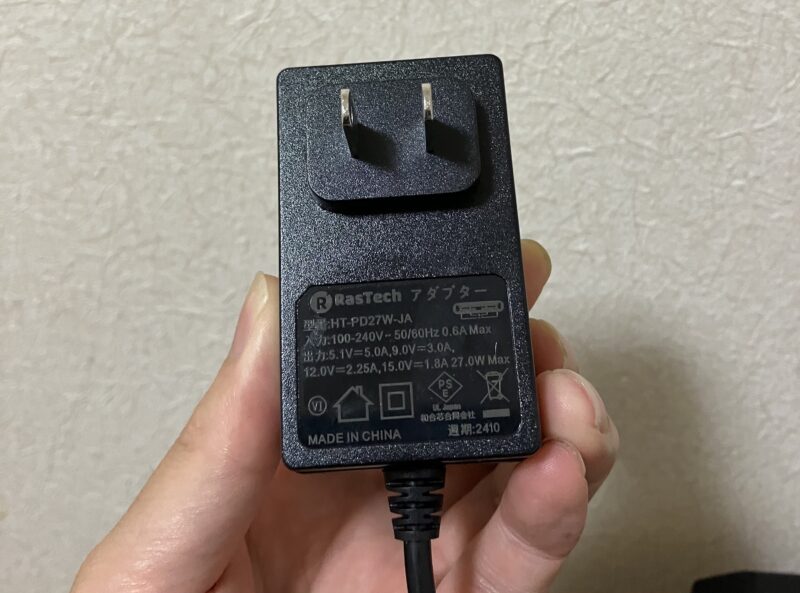
最近では5AのアダプターがAmazonで販売されています。試しにRasTechというメーカーの製品を買ってみたところ、警告メッセージも出ず、問題なく使用できました。国内で使用できることを示すPSEマークも付いています。
カメラコネクタが特殊
Raspberry Piのカメラモジュールは写真やビデオ撮影を可能にし、監視カメラシステム、AIによる画像認識など、さまざまなプロジェクトに利用できます。
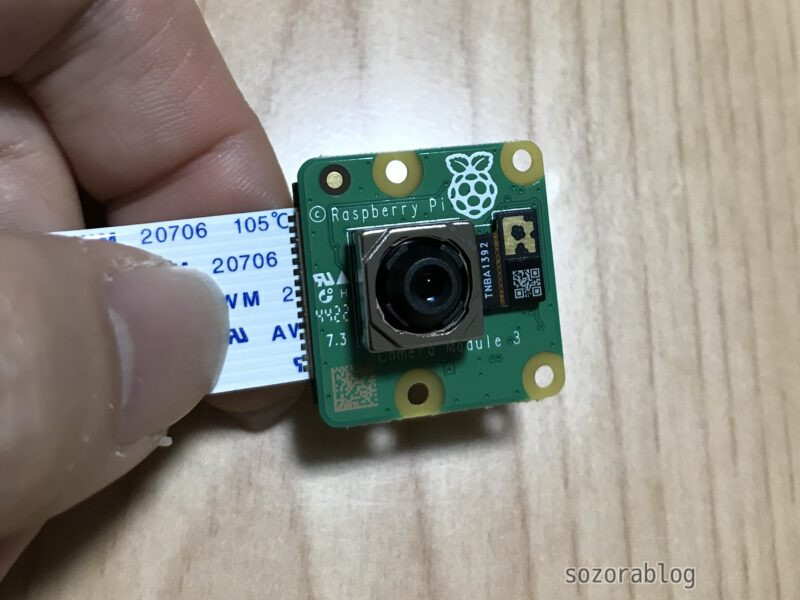
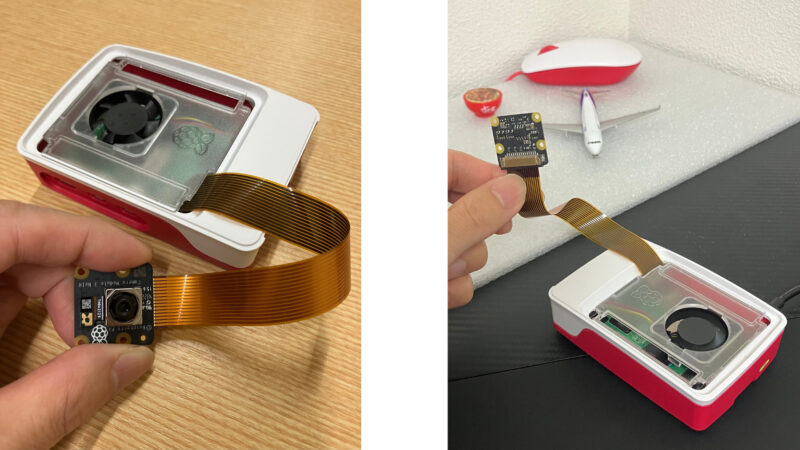
このカメラモジュールを接続するためのコネクタが、Pi 5では特殊なものが採用されています。Pi 5の0.5 mmピッチのコネクタは、従来の1.0 mmピッチのコネクタとは異なるため、カメラモジュールに付属しているケーブルが使用できません。
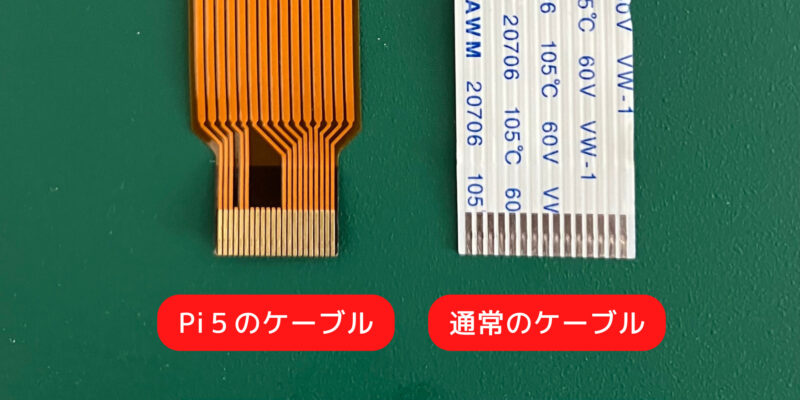
Pi 5で使用できるRaspberry Pi 5 FPCカメラケーブル(200mm)は数百円で購入可能であり、あらかじめ知っていれば大きな問題ではありません。
冷却ファンが必須
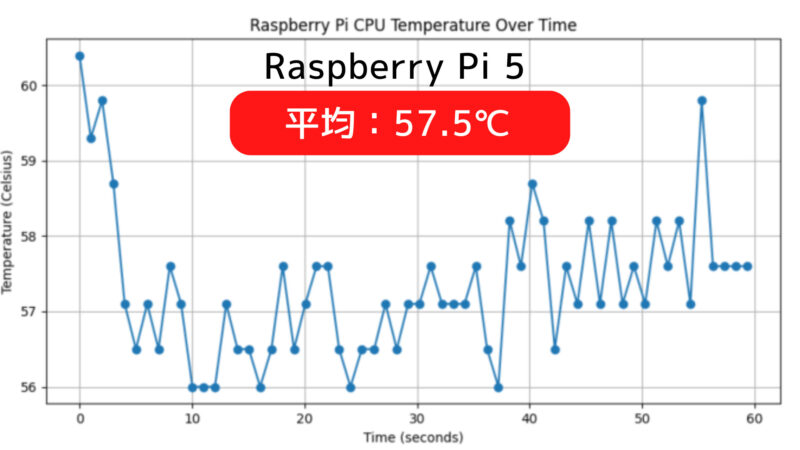
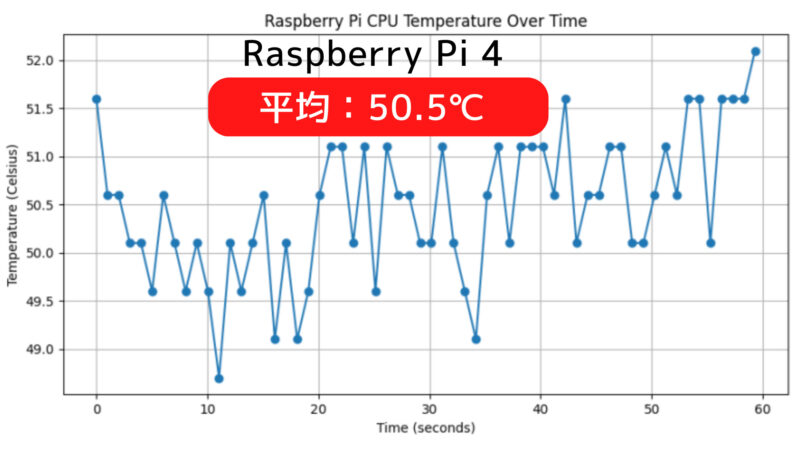
上記はPi 5とPi 4のCPU温度をグラフ化したものです。冷却ファンは使用せず同じ環境で測定したところ、Pi 5の方が7℃高い結果となりました。
Pi 5は、その高性能を発揮するために効果的な冷却が必要です。アイドル状態でもCPU温度が65℃近くに達することがあるPi 5は、負荷がかかったときにさらに温度が上昇します。長時間高温状態が続くと、システムの安定性や寿命に悪影響を及ぼす可能性があります。
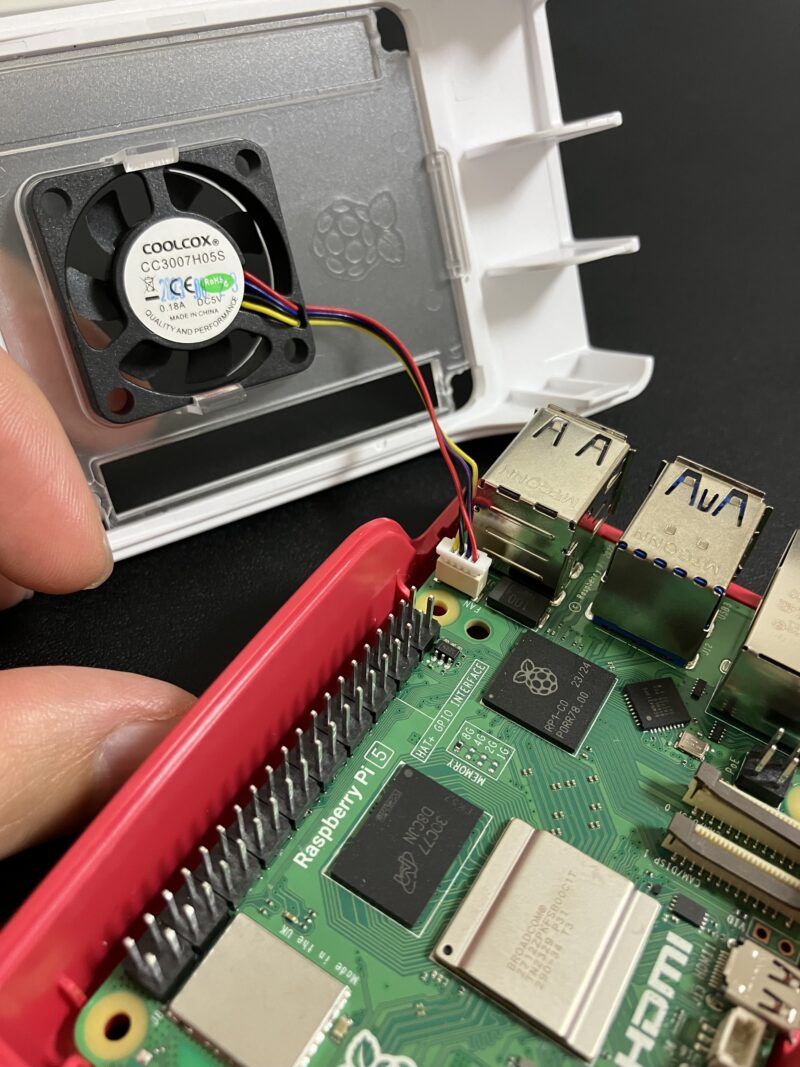
最も効果的な冷却方法の一つはファンの使用です。僕が使っているRaspberry Pi 5用公式ケースにはファンとヒートシンクが付属しており、効率的に熱を放散します。これにより、CPU温度を適切に管理できます。
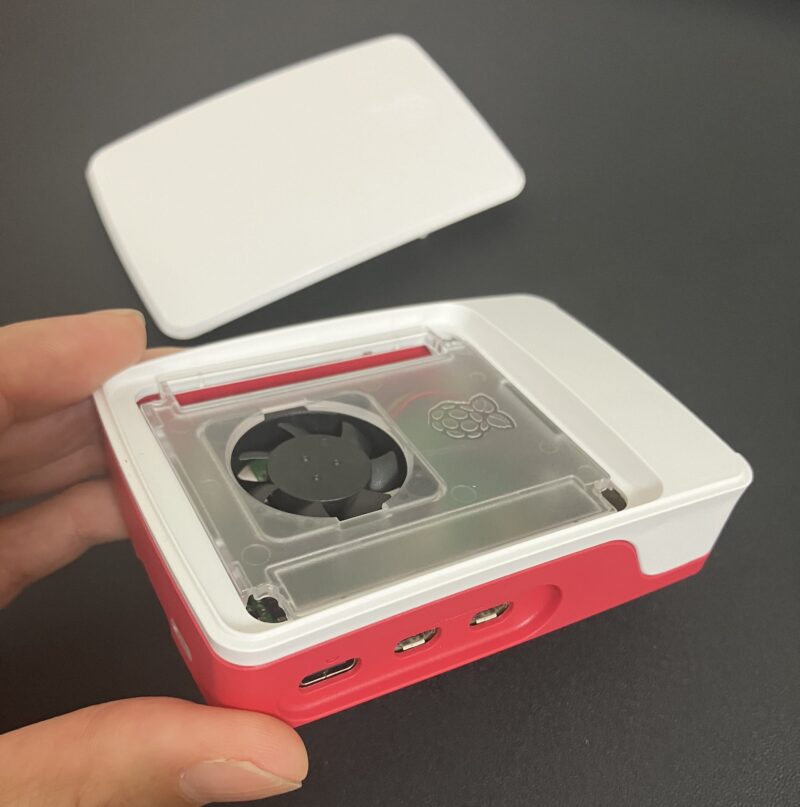
Pi 5には冷却ファン専用の4ピンコネクタが搭載されています。このコネクタは、ファンの電源供給と制御を行います。ファンはPWM(パルス幅変調)制御により、Raspberry Piの温度に応じて自動的に速度が調整されます。温度が60°Cに達するとファンが作動し始め、67.5°Cでは速度が上がり、75°Cでは最大速度に達します。
GPIOライブラリが一部非対応
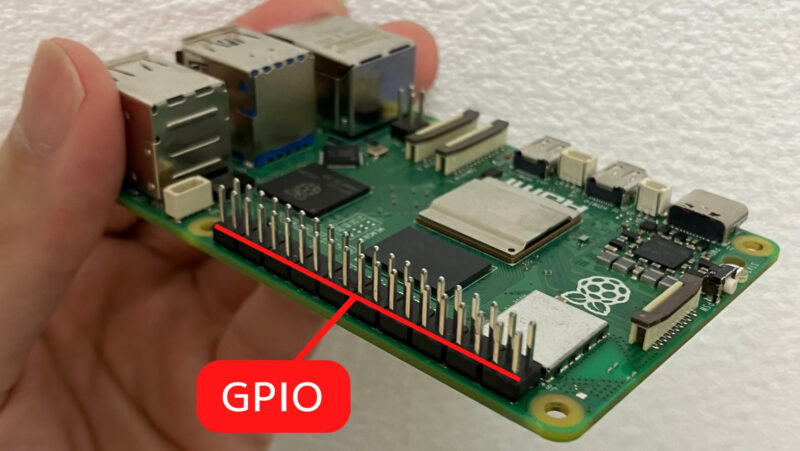
Pi 5では、GPIOの制御に新しいチップが使用されており、これにより従来のGPIOライブラリが正常に動作しなくなっています。GPIOは「General Purpose Input/Output」の略で、Raspberry Piのピンを通じてLEDやセンサー、モーターなどの外部デバイスを制御するための仕組みです。
以下は従来からよく使われているGPIOライブラリです。
| ライブラリ | Pi 5での使用可否 |
| RPi.GPIO | 使用不可 |
| gpiozero | 使用可能 |
| pigpio | 使用不可 |
| wiringPi | 使用不可 |
| lgpio | 使用可能 |
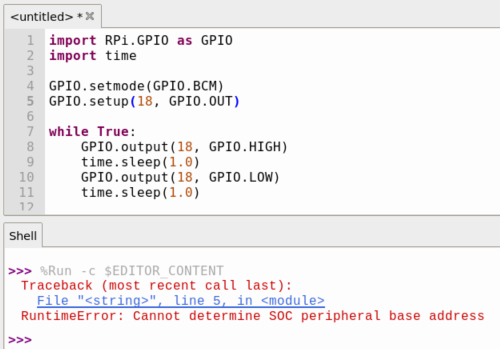
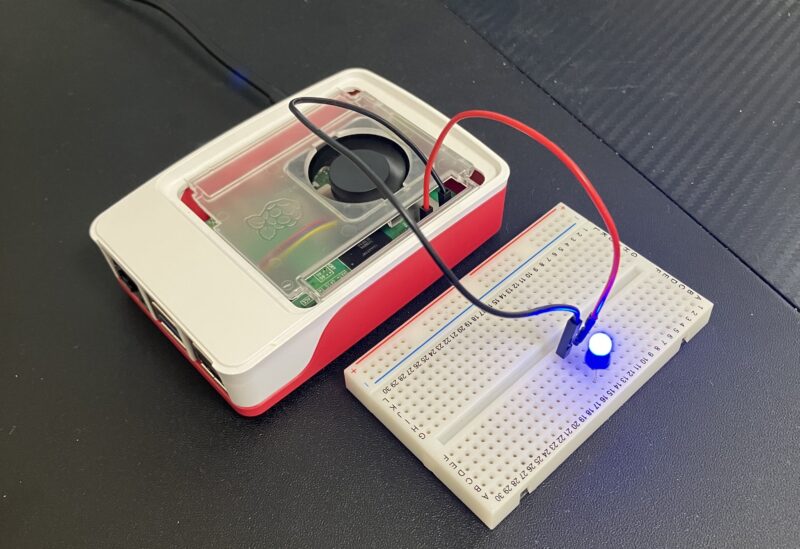
ラズパイに接続したLEDを点滅させるコードを試してみます。RPi.GPIOを使用した場合、以下のようにエラーが出て、LEDは光りません。
以下は上記のコードをgpiozeroに変更したものです。
from gpiozero import LED
import time

led = LED(18)

while True:
    led.on()

    time.sleep(1.0)

    led.off()

    time.sleep(1.0)
gpiozeroはPi 5に対応しているため、エラーが出ることなくLEDを点滅できました。
本やネットで公開されているプログラムを使いたいときには、使用するライブラリの確認が必要です。そのままのコードではPi 5で動作しない可能性があるため、注意しましょう。
pipの使用には仮想環境が必要
この問題はPi 5固有のものではなく、Raspberry Pi OS「Bookworm」の仕様によるものです。
Pythonのパッケージ管理に便利なpip
Raspberry Piでプログラミングをするにあたり、よく使われる言語のひとつがPythonです。Pythonではpipというパッケージ管理ツールを使うことで、さまざまなソフトウェア(パッケージ)を簡単にインストールできます。

インストールしたパッケージをPythonのプログラム内で呼び出すことにより、複雑な処理を短いコードで書くことができます。
Pi 5を使用する際、pipを使ってパッケージをインストールするためには仮想環境の作成が必要です。仮想環境とはプロジェクトごとに独立したPython環境を作成し、他のプロジェクトに影響を与えずにパッケージを管理するための仕組みです。
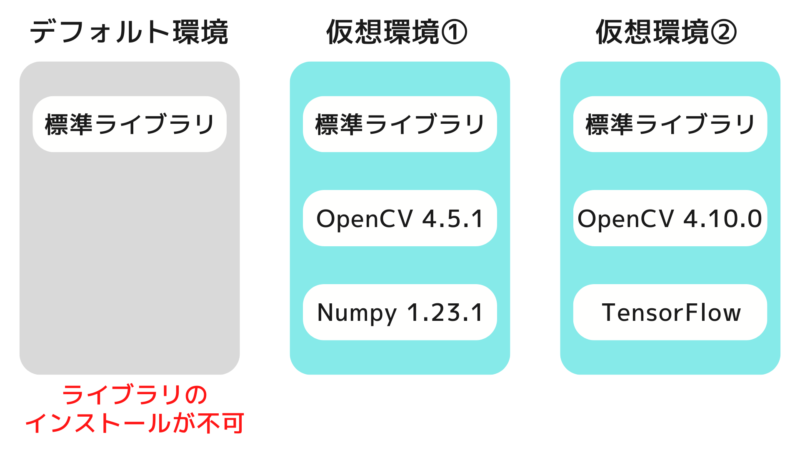
そのままpipを使うとエラーが出る
Raspberry Piカメラモジュールを制御するためのライブラリ「picamera2」をインストールしてみます。仮想環境を使わずにpipすると、次の画像のようにエラーが出てインストールできません。
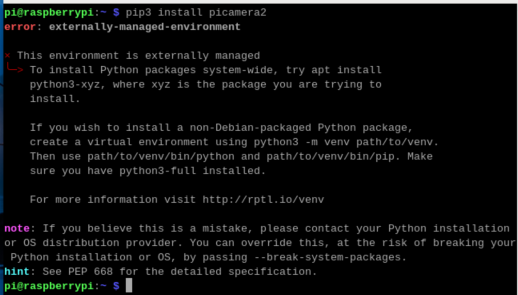
仮想環境でpipを実行する
仮想環境の作成自体は1行のコマンドで可能ですが、ラズパイを起動するたびに仮想環境を有効にする必要があります。初心者にとっては、この仕様が難しく感じられるかもしれません。
仮想環境「myenv」を作成するコマンド
python3 -m venv myenv仮想環境「myenv」を有効にするコマンド
source myenv/bin/activateその後、以下を実行すると「picamera2」をインストールできます。
pip install picamera2ライブラリの競合などの問題を回避するために仮想環境の作成は有効な手段です。この機会に仮想環境をマスターすることは、スキルアップに大いに役立ちます。
書籍の購入を推奨
以上の理由から、Pi 5を使用する際には、つまずきやすいポイントが多いです。自信がない方は、以下のようなPi 5対応の本を購入することをおすすめします。
僕も使い方を深く理解したいときにとてもお世話になっている本です。
Raspberry Pi 5をモバイルバッテリーで動かす

電源仕様についてはすでに解説したとおりですが、実際にモバイルバッテリーで動くのかが気になるところです。結論として、条件付きで動作します。
私の知る限りでは5V5Aに対応したモバイルバッテリーは存在せず、現実的には5V3Aでの運用になります。私はBelkinのモバイルバッテリー10000mAh(BPB011btBK)を使い、Raspberry Pi 5を動作させています。
USB PD非対応の5V3A給電となるためUSBポートの電流は合計0.6Aに制限され、この状態ではUSBストレージ起動や消費電流の大きいUSB機器の同時使用は不向きです。microSDカード起動であれば問題なく動作しますが、使用中に画面右上へ「電圧低下の警告」が表示されることがあります。
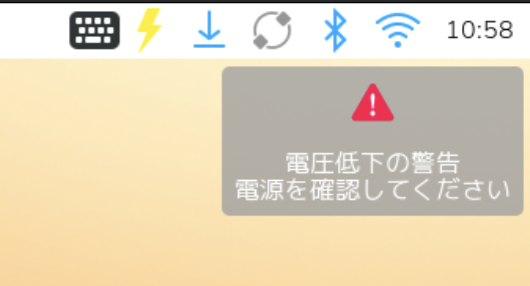
この警告は表示されても即座にシャットダウンや再起動が起きるものではなく、動作を継続できています。ただし、公式推奨構成ではない前提で、軽い用途に限定して使うのが無難でしょう。
Pi 5の良いところ
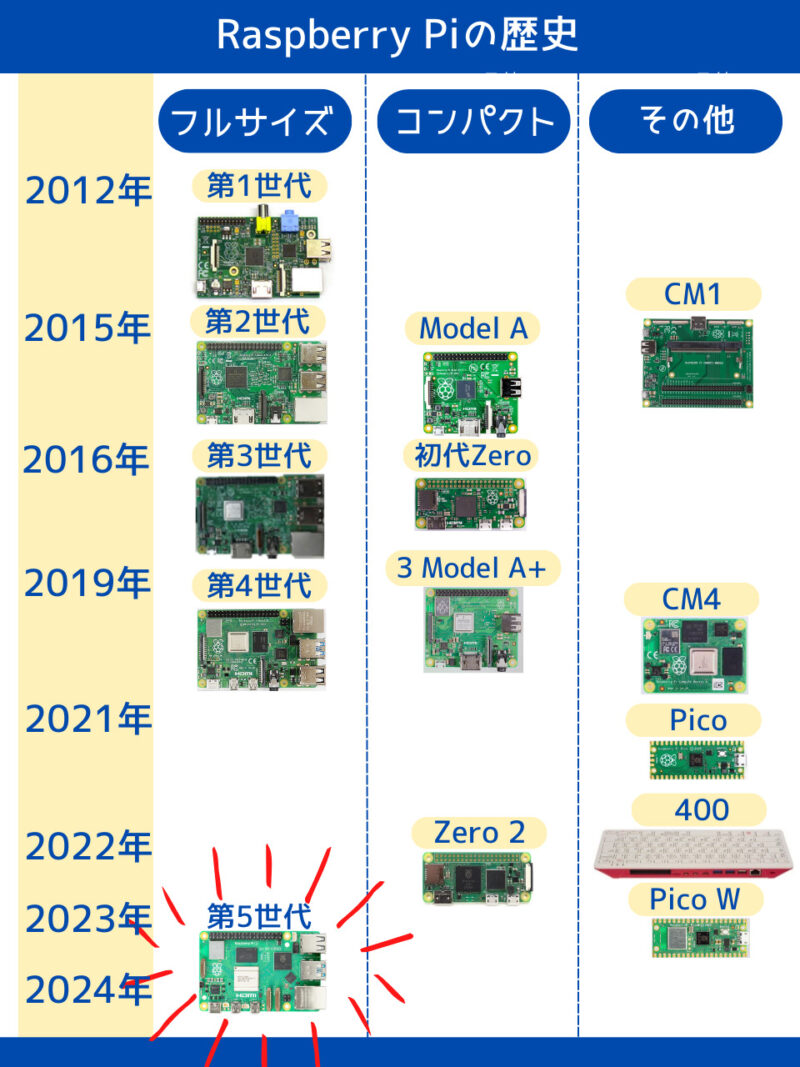
2025年時点で最新モデルであるPi 5が、他のモデルと比較して優れている点を紹介します。
起動が速い
Pi 5はどのモデルも起動時間が非常に短いです。以下は各モデルの起動時間を計測した結果です。このテストでは、すべて同一のmicroSDカードを使用しました。
| モデル名 | 起動時間 |
| Raspberry Pi 5 16GB | 22秒 |
| Raspberry Pi 5 8GB | 23秒 |
| Raspberry Pi 5 4GB | 22秒 |
| Raspberry Pi 400 | 34秒 |
| Raspberry Pi 4 8GB | 37秒 |
| Raspberry Pi 3 A+ | 78秒 |
| Raspberry Pi Zero 2 W | 97秒 |

Pi 5は、Pi 4やZero 2 Wに比べて起動時間が大幅に短く、約22〜23秒で起動します。特にZero 2 Wの97秒と比較すると、約4倍の速さです。

起動が速いのは処理性能が向上している証拠であり、アプリの立ち上げやブラウザの操作もスムーズに行えます。
電源ボタン
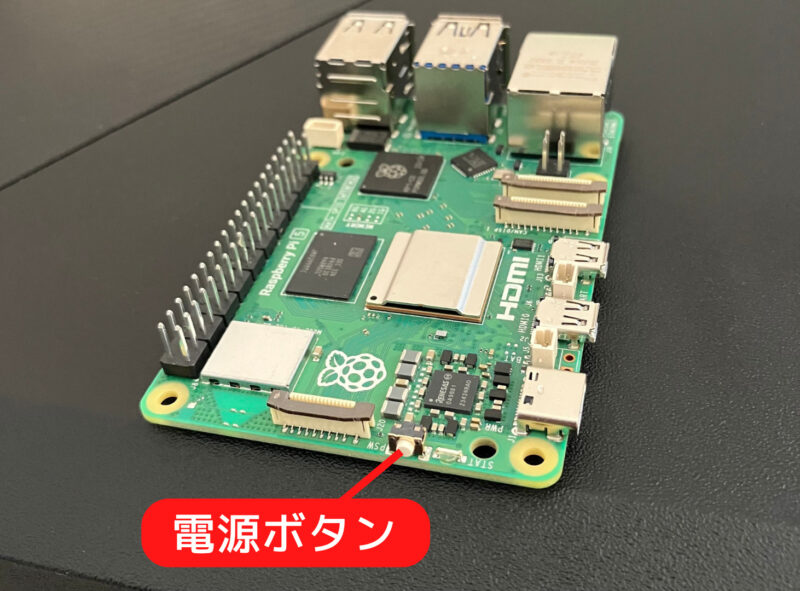
Pi 5には、他のモデルにはなかった電源ボタンが搭載されています。従来のRaspberry Piではケーブルを抜き差しして電源を管理する必要があった不便さを解消します。ボタン操作による電源のオンオフやシステムの再起動が簡単に行えるようになり、使い勝手が向上しました。
高性能でも価格はPi 4と大差なし
Pi 5とPi 4の同じメモリ容量のモデルを比較すると、価格差は約千円です。以下は8GBモデルの比較です。
以下は4GBモデルの比較です。
千円程度の価格差であれば、Pi 4がどうしても割高に感じます。それなら、最新で高性能なPi 5を試してみたいと思うのが自然な流れでしょう。
Pi 5で試したこと
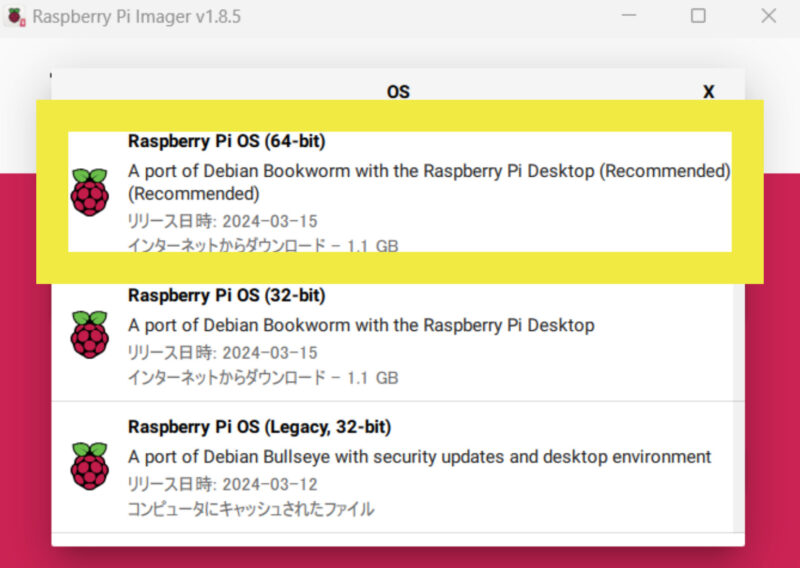
OSはRaspberry Pi OSの64-bit版をインストールしました。
Pi 5で最もやりたかったことはカメラモジュール V3を使った画像認識です。高速な処理が可能なのため、応答の速い作品が作れたことに驚きました。
リアルタイム物体認識
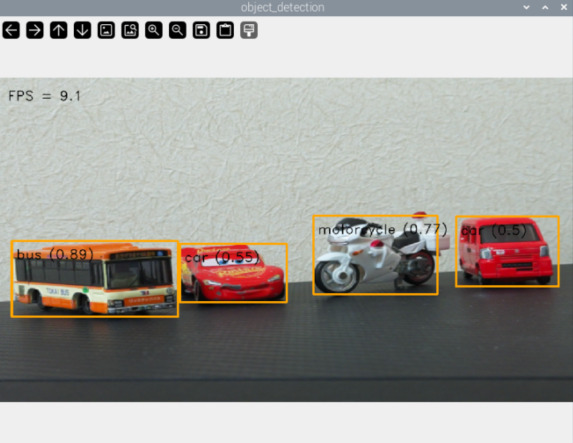
TensorFlow Lite(軽量版の機械学習ライブラリ)を使って物体認識を行いました。物体を認識すると、その物体を四角で囲み、物体名と認識の確度を表示します。処理速度は11〜13FPS(1秒間に処理できるフレーム数)で、Raspberry Pi 4の3〜4FPSに比べて大幅に高速化しています。
物体認識の環境を作成するには、ターミナルを開き、以下のコマンドを順に実行します。
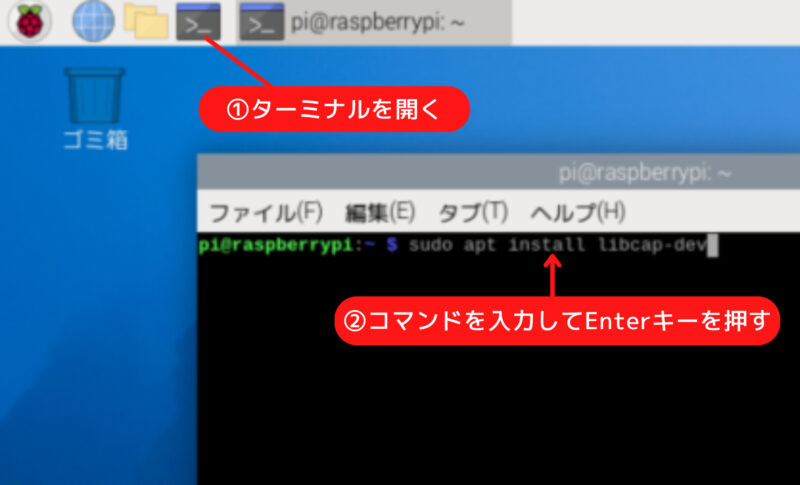
カメラ制御に必要な libcap ライブラリの開発用ヘッダーをインストールします。
sudo apt install libcap-devmpという名前のPython仮想環境を作成します。
python3 -m venv ~/mp --system-site-packages仮想環境を有効化します。
source ~/mp/bin/activateMediaPipeのサンプルコード一式をRaspberry Piにコピーします。MediaPipeは、Googleが提供するマルチプラットフォーム対応の機械学習ライブラリで、TensorFlow Liteを活用してリアルタイムの映像処理やモデル推論を効率的に行います。
git clone https://github.com/googlesamples/mediapipe.gitRaspberry Pi用のオブジェクト検出のサンプルコードがあるディレクトリに移動します。
cd mediapipe/examples/object_detection/raspberry_pi必要な依存パッケージのインストールと環境のセットアップをします。
sh setup.sh同じディレクトリ内に、物体認識のテストをするためのプログラムを作成します。
nano detect_test.py上記を実行すると、作成されたdetect_test.pyファイルがNanoエディタで開かれ、内容を編集できるようになります。
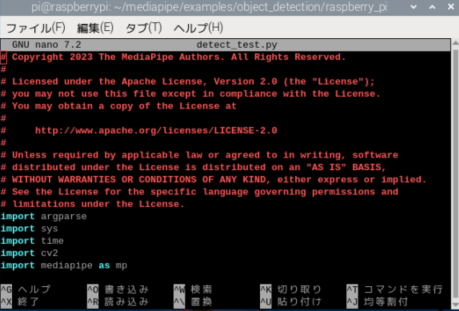
nanoエディタが開いたら、以下をコピーペーストして保存します。
# Copyright 2023 The MediaPipe Authors. All Rights Reserved.
#
# Licensed under the Apache License, Version 2.0 (the "License");
# you may not use this file except in compliance with the License.
# You may obtain a copy of the License at
#
#     http://www.apache.org/licenses/LICENSE-2.0
#
# Unless required by applicable law or agreed to in writing, software
# distributed under the License is distributed on an "AS IS" BASIS,
# WITHOUT WARRANTIES OR CONDITIONS OF ANY KIND, either express or implied.
# See the License for the specific language governing permissions and
# limitations under the License.
import argparse
import sys
import time
import cv2
import mediapipe as mp
from picamera2 import Picamera2
from libcamera import controls
from mediapipe.tasks import python
from mediapipe.tasks.python import vision
from utils import visualize

# Initial configuration of the camera
picam2 = Picamera2()
picam2.configure(picam2.create_preview_configuration(
    main={"format": 'XRGB8888', "size": (640, 480)}))
picam2.start()
picam2.set_controls({"AfMode": controls.AfModeEnum.Continuous})

# Global variables to calculate FPS
COUNTER, FPS = 0, 0
START_TIME = time.time()

def run(model: str, max_results: int, score_threshold: float,
        width: int, height: int) -> None:

    global is_inference_in_flight
    global latest_detection_result

    # Initialize global variables here
    is_inference_in_flight = False
    latest_detection_result = None

    def save_result(result: vision.ObjectDetectorResult,
                    unused_output_image: mp.Image,
                    timestamp_ms: int):
        """Callback when the detection is done."""
        global is_inference_in_flight, latest_detection_result, COUNTER, START_TIME, FPS

        # Mark that inference has finished, so we can send another frame
        is_inference_in_flight = False

        # Update FPS
        if COUNTER % fps_avg_frame_count == 0:
            current_time = time.time()
            FPS = fps_avg_frame_count / (current_time - START_TIME)
            START_TIME = current_time

        latest_detection_result = result
        COUNTER += 1

    # Initialize the object detection model
    base_options = python.BaseOptions(model_asset_path=model)
    options = vision.ObjectDetectorOptions(
        base_options=base_options,
        running_mode=vision.RunningMode.LIVE_STREAM,
        max_results=max_results,
        score_threshold=score_threshold,
        result_callback=save_result
    )
    detector = vision.ObjectDetector.create_from_options(options)

    # Visualization parameters
    row_size = 50  # pixels
    left_margin = 24  # pixels
    text_color = (0, 0, 0)  # black
    font_size = 1
    font_thickness = 1
    fps_avg_frame_count = 10

    # Create a window to display the detection results
    cv2.namedWindow('object_detection', cv2.WINDOW_NORMAL)
    cv2.resizeWindow('object_detection', 800, 600)

    while True:
        frame = picam2.capture_array()
        if frame is None:
            break

        # Resize and convert for inference
        image = cv2.resize(frame, (width, height))
        rgb_image = cv2.cvtColor(image, cv2.COLOR_BGR2RGB)
        mp_image = mp.Image(image_format=mp.ImageFormat.SRGB, data=rgb_image)

        # If the previous inference is done, start a new one
        if not is_inference_in_flight:
            detector.detect_async(mp_image, time.time_ns() // 1_000_000)
            is_inference_in_flight = True
        else:
            # If inference is still in flight,
            # we do NOT enqueue a new frame to avoid backlog
            pass

        # Draw FPS
        fps_text = 'FPS = {:.1f}'.format(FPS)
        text_location = (left_margin, row_size)
        cv2.putText(image, fps_text, text_location, cv2.FONT_HERSHEY_DUPLEX,
                    font_size, text_color, font_thickness, cv2.LINE_AA)

        # Visualize the latest detection result (if it exists)
        if latest_detection_result is not None:
            image = visualize(image, latest_detection_result)

        cv2.imshow('object_detection', image)

        # Stop if ESC is pressed
        if cv2.waitKey(1) == 27:
            break

    detector.close()
    picam2.stop()
    cv2.destroyAllWindows()

def main():
    parser = argparse.ArgumentParser(
        formatter_class=argparse.ArgumentDefaultsHelpFormatter)
    parser.add_argument('--model', help='Path of the object detection model.',
                        required=False, default='efficientdet.tflite')
    parser.add_argument('--maxResults', help='Max number of detection results.',
                        required=False, default=5)
    parser.add_argument('--scoreThreshold',
                        help='The score threshold of detection results.',
                        required=False, type=float, default=0.25)
    parser.add_argument('--cameraId', help='Id of camera.',
                        required=False, type=int, default=0)
    parser.add_argument('--frameWidth',
                        help='Width of frame to capture from camera.',
                        required=False, type=int, default=1280)
    parser.add_argument('--frameHeight',
                        help='Height of frame to capture from camera.',
                        required=False, type=int, default=720)
    args = parser.parse_args()

    run(args.model, int(args.maxResults), args.scoreThreshold,
        args.frameWidth, args.frameHeight)

if __name__ == '__main__':
    main()
保存して終了するには、Ctrl + O を押して保存し、Ctrl + X を押してNanoを終了します。
上記のコードは、Raspberry Piカメラモジュールを使用してリアルタイムでオブジェクト検出を行い、検出結果を表示するものです。EfficientDetモデル(efficientdet.tflite)を使用してオブジェクトを検出し、画面上に検出されたオブジェクトとFPSを描画します。
以下のコマンドでプログラムを実行できます。
python3 detect_test.pyプログラムを実行すると、次のように結果が表示されます。映っているのはすべてトミカですが、バスやmotorcycle(バイク)をしっかり判別できています。
実行中のdetect_test.pyを終了するには、ターミナルで Ctrl + C を押します。
ジェスチャー認識
先ほどコピーしたMediaPipeのサンプルコードには、ジェスチャー認識を行うプログラムも含まれています。これから、ジェスチャー認識の手順を説明します。まずはホームディレクトリに移動します。
cdジェスチャー認識のサンプルコードがあるディレクトリに移動します。
cd mediapipe/examples/gesture_recognizer/raspberry_piジェスチャー認識サンプルを動作させるための必要なパッケージのインストールと、環境のセットアップをします。
sh setup.sh同じディレクトリ内に、ジェスチャー認識のテストをするためのプログラムを作成します。
nano recognize_test.pynanoエディタが開いたら、以下をコピーペーストして保存します。
# Copyright 2023 The MediaPipe Authors. All Rights Reserved.
#
# Licensed under the Apache License, Version 2.0 (the "License");
# you may not use this file except in compliance with the License.
# You may obtain a copy of the License at
#
#     http://www.apache.org/licenses/LICENSE-2.0
#
# Unless required by applicable law or agreed to in writing, software
# distributed under the License is distributed on an "AS IS" BASIS,
# WITHOUT WARRANTIES OR CONDITIONS OF ANY KIND, either express or implied.
# See the License for the specific language governing permissions and
# limitations under the License.
import argparse
import sys
import time
import cv2
import mediapipe as mp
from mediapipe.tasks import python
from mediapipe.tasks.python import vision
from mediapipe.framework.formats import landmark_pb2
import numpy as np
from picamera2 import Picamera2
from libcamera import controls

mp_hands = mp.solutions.hands
mp_drawing = mp.solutions.drawing_utils
mp_drawing_styles = mp.solutions.drawing_styles

# Initial configuration of the camera
picam2 = Picamera2()
picam2.configure(picam2.create_preview_configuration(main={"format": 'XRGB8888', "size": (320, 240)}))
picam2.start()
picam2.set_controls({"AfMode": controls.AfModeEnum.Continuous})

# Global variables to calculate FPS and control inference
COUNTER, FPS = 0, 0
START_TIME = time.time()
is_inference_in_flight = False  # Flag to control inference execution
latest_recognition_result = None  # Variable to store the latest recognition result

def run(model: str, num_hands: int, min_hand_detection_confidence: float,
        min_hand_presence_confidence: float, min_tracking_confidence: float,
        camera_id: int, width: int, height: int) -> None:
    global is_inference_in_flight, latest_recognition_result

    def save_result(result: vision.GestureRecognizerResult,
                    unused_output_image: mp.Image, timestamp_ms: int):
        """Callback when the gesture recognition is done."""
        global is_inference_in_flight, latest_recognition_result, COUNTER, START_TIME, FPS

        # Mark that inference has finished
        is_inference_in_flight = False

        # Update FPS
        if COUNTER % fps_avg_frame_count == 0:
            current_time = time.time()
            FPS = fps_avg_frame_count / (current_time - START_TIME)
            START_TIME = current_time

        latest_recognition_result = result
        COUNTER += 1

    # Initialize the gesture recognizer model
    base_options = python.BaseOptions(model_asset_path=model)
    options = vision.GestureRecognizerOptions(
        base_options=base_options,
        running_mode=vision.RunningMode.LIVE_STREAM,
        num_hands=num_hands,
        min_hand_detection_confidence=min_hand_detection_confidence,
        min_hand_presence_confidence=min_hand_presence_confidence,
        min_tracking_confidence=min_tracking_confidence,
        result_callback=save_result
    )
    recognizer = vision.GestureRecognizer.create_from_options(options)

    # Visualization parameters
    row_size = 50  # pixels
    left_margin = 24  # pixels
    text_color = (0, 0, 0)  # black
    font_size = 1
    font_thickness = 1
    fps_avg_frame_count = 10
    label_text_color = (0, 0, 0)  # black
    label_background_color = (255, 255, 255)  # white
    label_font_size = 1
    label_thickness = 2
    label_padding_width = 100  # pixels

    # Create a window to display the recognition results
    cv2.namedWindow("Gesture Recognition", cv2.WINDOW_NORMAL)
    cv2.resizeWindow("Gesture Recognition", 800, 600)

    while True:
        # Capture frame from the camera
        frame = picam2.capture_array()
        if not isinstance(frame, np.ndarray):
            print("Frame is not a numpy array.")
            return

        # Resize and preprocess the frame
        image = frame[:, :, :3]
        image_resized = cv2.resize(image, (width, height))
        rgb_image = cv2.cvtColor(image_resized, cv2.COLOR_BGR2RGB)
        mp_image = mp.Image(image_format=mp.ImageFormat.SRGB, data=rgb_image)

        # Start a new inference if the previous one is done
        if not is_inference_in_flight:
            recognizer.recognize_async(mp_image, time.time_ns() // 1_000_000)
            is_inference_in_flight = True

        # Show the FPS on the frame
        fps_text = 'FPS = {:.1f}'.format(FPS)
        text_location = (left_margin, row_size)
        current_frame = image_resized
        cv2.putText(current_frame, fps_text, text_location, cv2.FONT_HERSHEY_DUPLEX,
                    font_size, text_color, font_thickness, cv2.LINE_AA)

        # Draw the latest hand landmarks if available
        if latest_recognition_result is not None:
            for hand_landmarks in latest_recognition_result.hand_landmarks:
                hand_landmarks_proto = landmark_pb2.NormalizedLandmarkList()
                hand_landmarks_proto.landmark.extend([
                    landmark_pb2.NormalizedLandmark(x=landmark.x, y=landmark.y, z=landmark.z)
                    for landmark in hand_landmarks
                ])
                mp_drawing.draw_landmarks(
                    current_frame,
                    hand_landmarks_proto,
                    mp_hands.HAND_CONNECTIONS,
                    mp_drawing_styles.get_default_hand_landmarks_style(),
                    mp_drawing_styles.get_default_hand_connections_style()
                )

            # Show the gesture classification if available
            gestures = latest_recognition_result.gestures
            if gestures:
                category_name = gestures[0][0].category_name
                score = round(gestures[0][0].score, 2)
                result_text = category_name + ' (' + str(score) + ')'

                # Compute text size
                text_size = cv2.getTextSize(result_text, cv2.FONT_HERSHEY_DUPLEX, label_font_size,
                                            label_thickness)[0]
                text_width, text_height = text_size

                # Compute centered x, y coordinates
                legend_x = (current_frame.shape[1] - text_width) // 2
                legend_y = current_frame.shape[0] - (label_padding_width - text_height) // 2

                # Draw the text
                cv2.putText(current_frame, result_text, (legend_x, legend_y),
                            cv2.FONT_HERSHEY_DUPLEX, label_font_size,
                            label_text_color, label_thickness, cv2.LINE_AA)

        # Expand the frame to show the labels
        current_frame = cv2.copyMakeBorder(current_frame, 0, label_padding_width, 0, 0,
                                           cv2.BORDER_CONSTANT, None, label_background_color)

        cv2.imshow("Gesture Recognition", current_frame)

        # Stop the program if the ESC key is pressed
        if cv2.waitKey(1) == 27:
            break

    recognizer.close()
    picam2.stop()
    cv2.destroyAllWindows()

def main():
    parser = argparse.ArgumentParser(formatter_class=argparse.ArgumentDefaultsHelpFormatter)
    parser.add_argument('--model', help='Name of gesture recognition model.',
                        required=False, default='gesture_recognizer.task')
    parser.add_argument('--numHands', help='Max number of hands that can be detected by the recognizer.',
                        required=False, default=1)
    parser.add_argument('--minHandDetectionConfidence', help='The minimum confidence score for hand detection.',
                        required=False, default=0.5)
    parser.add_argument('--minHandPresenceConfidence', help='The minimum confidence score of hand presence.',
                        required=False, default=0.5)
    parser.add_argument('--minTrackingConfidence', help='The minimum confidence score for hand tracking.',
                        required=False, default=0.5)
    parser.add_argument('--cameraId', help='Id of camera.', required=False, default=0)
    parser.add_argument('--frameWidth', help='Width of frame to capture from camera.',
                        required=False, default=640)
    parser.add_argument('--frameHeight', help='Height of frame to capture from camera.',
                        required=False, default=480)
    args = parser.parse_args()

    run(args.model, int(args.numHands), args.minHandDetectionConfidence,
        args.minHandPresenceConfidence, args.minTrackingConfidence,
        int(args.cameraId), args.frameWidth, args.frameHeight)


if __name__ == '__main__':
    main()
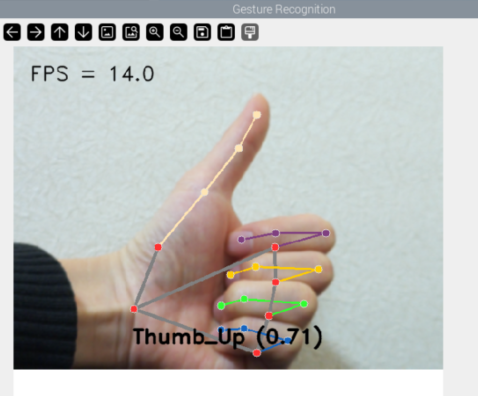
まず、TensorFlow Liteを使って、手のジェスチャーを認識します。次に、MediaPipeというGoogleが提供するフレームワークを利用して、手のランドマーク(手の関節などの位置)を検出し画面に表示します。検出されたランドマークのデータをもとに、モデルは各ジェスチャーに対応する確率(信頼度)を計算します。この中から最も高い確率を持つジェスチャーが認識結果として表示される仕組みです。
以下のコマンドでプログラムを実行します。
python3 recognize_test.py プログラムを実行すると、次のように結果が表示されます。
上記のコードを応用すると、以下のようなことができます。
スマートクロックのLaMetric TimeとPi 5は、Pi 5インターネットを通じて情報をやり取りしています。これにより、リアルタイムでジェスチャーの認識結果を視覚的に確認できます。
まとめ
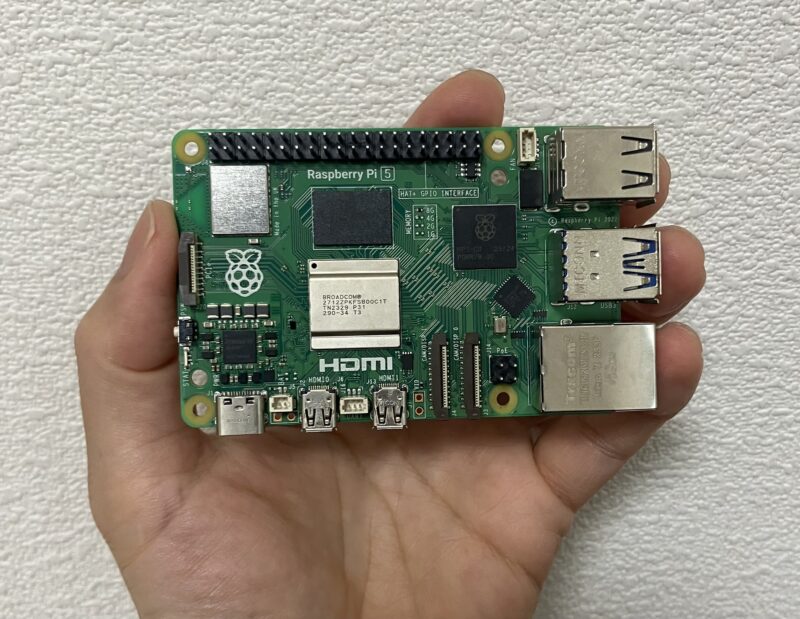
本記事ではRaspberry Pi 5を購入する前に知っておくべき5つの注意点を紹介しました。いずれも致命的な欠点ではありませんが、事前に知っておくことで購入後のトラブルを避けられるでしょう。ネット上の情報はまだPi 5に対応していないものが多いため、注意が必要です。これらを理解したうえで購入するならば、Pi 5は非常にパワフルで可能性を秘めたマシンといえます。
一方で、ラズパイにそこまでの性能を求めていないという声もよく耳にします。僕自身、8種類のラズパイを持っていますが、用途に応じてモデルを使い分けています。電子工作メインで使用することが多い僕にとってはPi 5はスペックを持て余していると感じることがあります。

実際のところ、2025年1月時点で僕が頻繁に使用するのはPi 4です。
性能や新しさよりも、自分がラズパイで何をしたいのかを明確にすることで、失敗のない買い物ができるでしょう。

参考になりました。GPIO の使い方が違うとの事で、従来プログラムの書換えが面倒ですね。あとは、仮想環境っていうものの概念がまだピンときません。高速化はありがたいのですが、発熱も心配ですね。3B には小さなFAN を付けましたが、4 は大型ヒートシンクでFANレス運転してます。静かで快適です。もうしばらく 4 でガマンします。
コメントありがとうございます!
GPIOの変更は確かに書き換えが必要な場面があるので、少し手間ですよね。
仮想環境はPythonの異なるプロジェクト間でライブラリのバージョンを分けて管理できる便利なツールです。ちょっと難しく感じるかもしれませんが、慣れると環境の切り替えが簡単になります。
しばらくPi 4で楽しむのも良い選択だと思います!